Introduction to GIT
This work is a derivate of Pro Git book by Scott Chacon and Ben Straub and published by Apress. All content is licensed under the Creative Commons Attribution Non Commercial Share Alike 3.0 license.
Git is a free and open source distributed version control system designed to handle everything from small to very large projects with speed and efficiency.
Everything is local
- Everything is fast
- Every clone is a backup
- work offline. No network needed for
- Performing a diff
- Viewing file history
- Committing changes
- Merging branches
- Switching branches
Setup
Git Config
User 'git config' to set/get config properties.
- /etc/gitconfig file: Contains values for every user on the system and all their repositories.
git config --system - ~/.gitconfig file: Specific to your user.
git config --global - .git/config file: Specific to whatever repository you’re currently using. Also default file used if scope is not spedicifed
git config
Git Config (initial setup)
- Your identity
$ git config --global user.name "John Doe" $ git config --global user.email "johndoe@example.com" - Your editor
$ git config --global core.editor emacs - Your difftool
$ git config --global merge.tool vimdiff
Git Config (Check your settigns)
- List all settings
$ git config --list user.name=Omair Sajid user.email=omair.sajid@confiz.com color.status=auto color.branch=auto color.interactive=auto color.diff=auto ... - Or for a particular key only
  $ git config user.name
  Omair Sajid
Getting help
- Getting help
$ git help$ git <verb> --help $ man git-<verb> - E.g. to get help for the config command
$ git help config
Getting a git repository (Excersie 1)
- Initializing a Repository in an Existing Directory
$ git init $ git add README $ git commit -m 'initial project version' - Cloning an Existing Repository
  $ git clone git://github.com/schacon/grit.git
  $ git clone git://github.com/schacon/grit.git mygrit
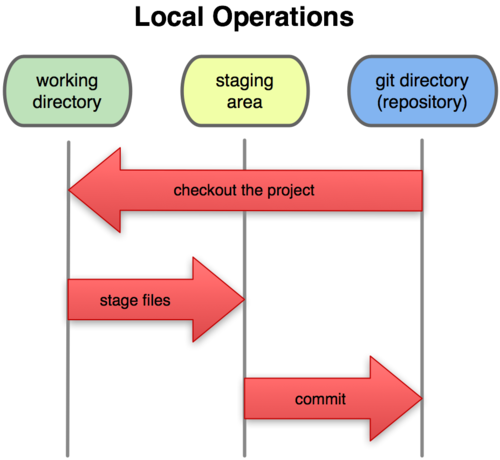
Recording Changes to the Repository
The Three stages
A git project has three main sections. Git directory, the working directory, and the staging area.
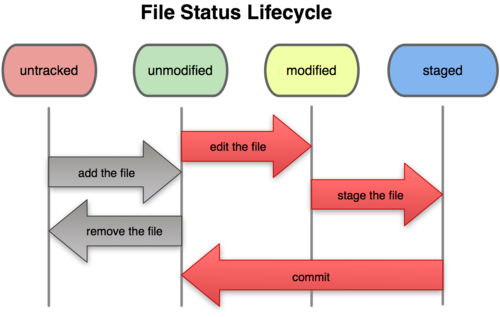
Checking the Status of Your Files
-
The main tool you use to determine which files are in which state is the git status command
  $ git status
  # On branch master
  nothing to commit (working directory clean)
Adding new files (1)
-
Let’s say you add a new file to your project, a simple README file.
$ vim README $ git status # On branch master # Untracked files: # (use "git add <file>..." to include in what will be committed) # # README nothing added to commit but untracked files present (use "git add" to track) -
In order to begin tracking a new file, you use the command git add
$ git add README
Adding new files (2)
-
If we run git status again
  $ git status
  # On branch master
  # Changes to be committed:
  #   (use "git reset HEAD <file>..." to unstage)
  #
  #   new file:   README
  #
Staging Modified files (1)
-
Modify an existing tracked file (e.g. benchmarks.rb) and run git status
  $ git status
  # On branch master
  # Changes to be committed:
  #   (use "git reset HEAD <file>..." to unstage)
  #
  #   new file:   README
  #
  # Changed but not updated:
  #   (use "git add <file>..." to update what will be committed)
  #
  #   modified:   benchmarks.rb
  #
Staging Modified files (2)
-
To stage let's do 'git add' and run 'git status'
  $ git add benchmarks.rb
  $ git status
  # On branch master
  # Changes to be committed:
  #   (use "git reset HEAD <file>..." to unstage)
  #
  #   new file:   README
  #   modified:   benchmarks.rb
  #
Staging Modified files (3)
-
Let's modify benchmarks.rb again and run 'git status'
Now benchmarks.rb is listed as both staged and unstaged$ vim benchmarks.rb $ git status # On branch master # Changes to be committed: # (use "git reset HEAD <file>..." to unstage) # # new file: README # modified: benchmarks.rb # # Changed but not updated: # (use "git add <file>..." to update what will be committed) # # modified: benchmarks.rb #
Staging Modified files (4)
-
Run git add again to stage the latest version of the file
$ git add benchmarks.rb $ git status # On branch master # Changes to be committed: # (use "git reset HEAD..." to unstage) # # new file: README # modified: benchmarks.rb #
Viewing Your Staged and Unstaged Changes (1)
-
To see what you’ve changed but not yet staged, type git diff with no other arguments:
  $ git diff
  diff --git a/benchmarks.rb b/benchmarks.rb
  index 3cb747f..da65585 100644
  --- a/benchmarks.rb
  +++ b/benchmarks.rb
  @@ -36,6 +36,10 @@ def main
             @commit.parents[0].parents[0].parents[0]
           end

  +        run_code(x, 'commits 1') do
  +          git.commits.size
  +        end
  +
           run_code(x, 'commits 2') do
             log = git.commits('master', 15)
             log.size
Viewing Your Staged and Unstaged Changes (2)
-
This compare your staged changes to your last commit (or use git diff --staged for git version > 1.6.1)
  $ git diff --cached
  diff --git a/README b/README
  new file mode 100644
  index 0000000..03902a1
  --- /dev/null
  +++ b/README2
  @@ -0,0 +1,5 @@
  +grit
  + by Tom Preston-Werner, Chris Wanstrath
  + http://github.com/mojombo/grit
  +
  +Grit is a Ruby library for extracting information from a Git repository
Committing Your Changes (1)
-
To commit your changes use 'git commit'. Remember that whatever has been staged (using git add) will be committed.
$ git commit -
This will launch editor you configured during setup and will ask for comment.
  # Please enter the commit message for your changes. Lines starting
  # with '#' will be ignored, and an empty message aborts the commit.
  # On branch master
  # Changes to be committed:
  #   (use "git reset HEAD <file>..." to unstage)
  #
  #       new file:   README
  #       modified:   benchmarks.rb
  ~
  ~
  ".git/COMMIT_EDITMSG" 10L, 283C
Committing Your Changes (2)
-
A sample commit message is given below
  This is header

  Commit message should have a subject (first line) a blank line and then details.
  This way different tools can generate better nofications. E.g. if an email
  notificaiton is gerneated then first line will used as subject of email and rest as
  email body.
  You should also refer your jira/redmine task in comment. E.g. Fixes Ticket #1234.
  This will automatically (if configured )add a comment to your jira/redmine task referencing this commit.

  # Please enter the commit message for your changes. Lines starting
  # with '#' will be ignored, and an empty message aborts the commit.
  # On branch master
  # Changes to be committed:
  #   (use "git reset HEAD <file>..." to unstage)
  #
  #       new file:   README
  #       modified:   benchmarks.rb
  ~
  ~
  ".git/COMMIT_EDITMSG" 10L, 283C
Committing Your Changes (3) - Exercise 2
-
Or you can type your commit message inline with the commit command by specifying it after a -m flag
  $ git commit -m "Story #182: Fix benchmarks for speed"
  [master]: created 463dc4f: "Fix benchmarks for speed"
    2 files changed, 3 insertions(+), 0 deletions(-)
    create mode 100644 README
Undoing Things (1)
-
Unstaging a Staged File: Use this when you have accidentally staged a file and want to move it back to modified state
$ git reset HEAD benchmarks.rb benchmarks.rb: locally modified $ git status # On branch master # Changes to be committed: # (use "git reset HEAD..." to unstage) # # modified: README.txt # # Changed but not updated: # (use "git add ..." to update what will be committed) # (use "git checkout -- ..." to discard changes in working directory) # # modified: benchmarks.rb
Undoing Things (2)
-
Unmodifying a Modified File: Use this when you want to revert your file to last commit.
$ git checkout -- benchmarks.rb $ git status # On branch master # Changes to be committed: # (use "git reset HEAD..." to unstage) # # modified: README.txt #
Working with Remotes
Working with Remotes (1)
- Remote repositories are versions of your project that are hosted on the Internet or network somewhere.
- You can have several of them, each of which generally is either read-only or read/write for you
- Collaborating with others involves managing these remote repositories and pushing and pulling data to and from them when you need to share work.
Working with Remotes (2) - Exercise 3
Listing remotes
$ git remote$ git remote add <name> <path-to-repo>$ git remote rm <path-to-repo>Git Branching
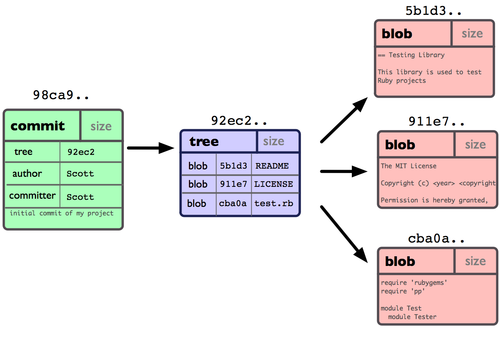
Git Branching (1)
Conceptually, a single commit looks something like.
Git Branching (2)
After couple of commits.

Git Branching (3)
A branch is simple a pointer to one of these commits.
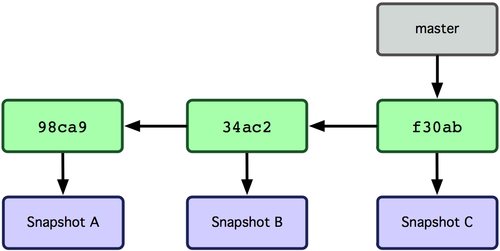
A branch in Git is in actuality a simple file that contains the 40 character SHA-1 checksum of the commit it points to, branches are cheap to create and destroy. Creating a new branch is as quick and simple as writing 41 bytes to a file (40 characters and a newline).
Git Branching (4)
Creating a new branch creates a new pointer at the same commit you're currently on.
$ git branch testing 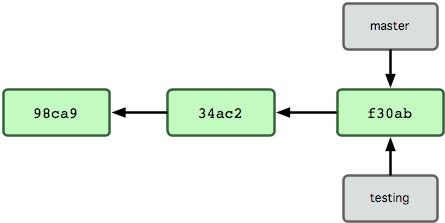
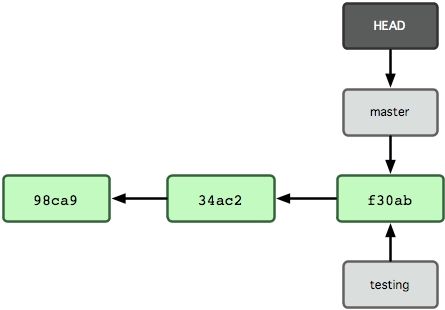
Git Branching (5)
To keep track of branch we are currently on. Git uses a special pointer called HEAD (The git branch command only created a new branch — it didn’t switch to that branch )
Git Branching (6)
To switch to an existing branch, you run the git checkout command
$ git checkout testing 
Git Branching (7)
Let's do a commit
 $ vim test.rb
 $ git commit -a -m 'made a change'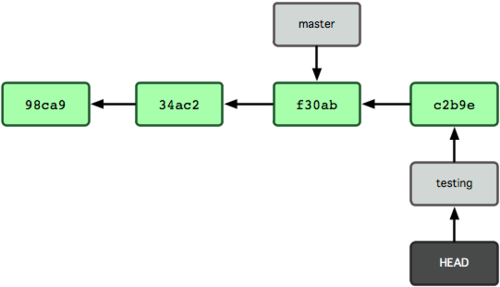
Notice that only testing branch (pointer) has move forward. But master branch still points to the commit you were on when you ran git checkout to switch branches.
Git Branching (8)
Now switching to master branch will move the HEAD pointer to master branch, and will revert files in working directory to the snapshot master poitns to.
$ git checkout master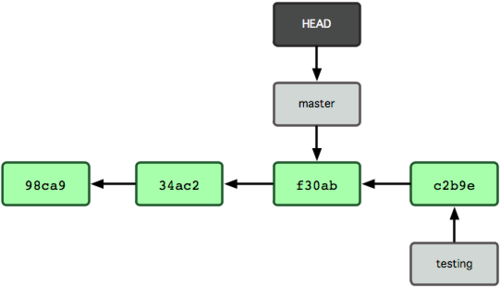
Git Branching (9) - Exercise 4
Doing another commit now will move master branch forward
$ vim test.rb
$ git add test.rb
$ git commit -m "...."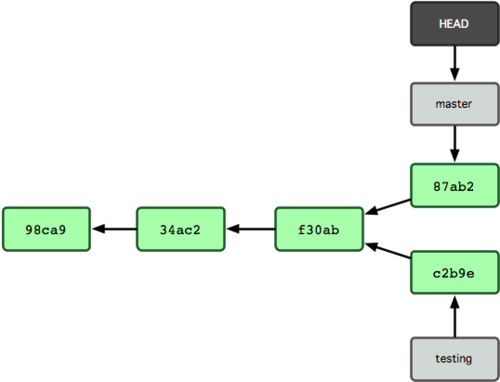
Merging
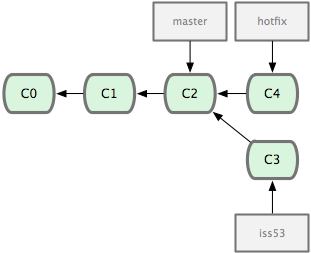
Merging (1)
Consider a repository with three branches as in figure below
Merging (2)
Fast Forward Merge: Let's first merge hotfix into master
$ git checkout master
$ git merge hotfix
Updating f42c576..3a0874c
Fast forward
README |    1 -
1 files changed, 0 insertions(+), 1 deletions(-)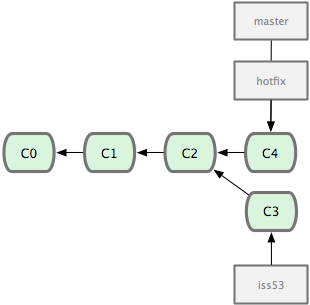
Merging (3)
As hotfix branch is merged into master so we will get rid of hotfix branch now
$ git branch -d hotfix
Deleted branch hotfix (3a0874c).
Merging (4)
Continue work on iss53 branch
$ git checkout iss53
Switched to branch "iss53"
$ vim index.html
$ git commit -a -m ’finished the new footer [issue 53]’
[iss53]: created ad82d7a: "finished the new footer [issue 53]"
 1 files changed, 1 insertions(+), 0 deletions(-)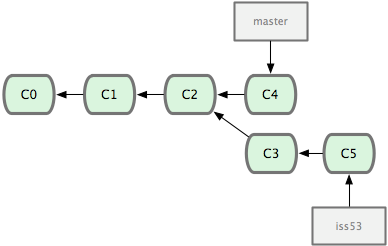
Merging (5)
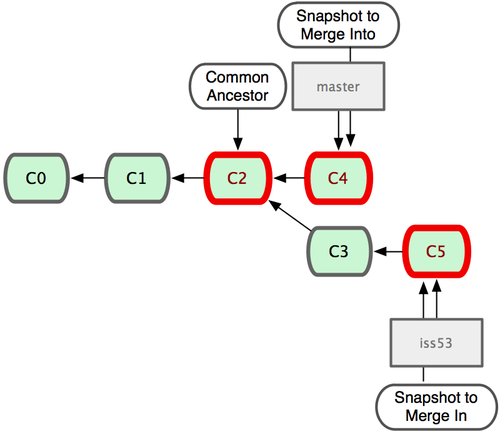
Three-way merge: Time to merge iss53 into master
$ git checkout master
[master *]$ git merge iss53
Merge made by recursive.
 README |    1 +
 1 files changed, 1 insertions(+), 0 deletions(-)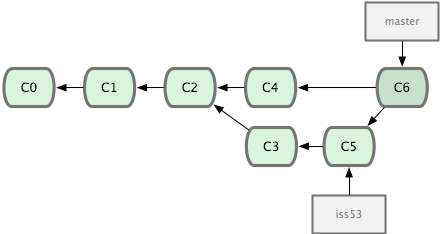
Merging (6) - Exercise 5
Git automatically identifies the best common-ancestor merge base for branch merging. It then creates a new snapshot by doing a three-way merge and automatically creates a new commit that points to it. This is referred to as a merge commit and is special in that it has more than one parent.
Merge Conflicts
Merge Conflicts (1)
Occasionally, this process doesn’t go smoothly. Git will not always be able to merge files cleanly. E.g. If our fix for issue #53 modified the same part of a file as the hotfix, we’ll get a merge conflict that looks something like this:
$ git merge iss53
Auto-merging index.html
CONFLICT (content): Merge conflict in index.html

Automatic merge failed; fix conflicts and then commit the result.
Running git status now will show us somthing like
[master*]$ git status
index.html: needs merge
# On branch master
# Changed but not updated:
#   (use "git add ..." to update what will be committed)
#   (use "git checkout -- ..." to discard changes in working directory)
#
# unmerged:   index.html
Merge Conflicts (2)
We can now open the file and resolve conflicts. File with conflicts will contain section that will look something like
<<<<<<< HEAD:index.html
<div id="footer">contact : email.support@github.com</div>
=======
<div id="footer">
  please contact us at support@github.com
</div>
>>>>>>> ss53:index.html
Merge Conflicts (3)
How we resolve conflict is upsto us. We can choese either side or merge the contents from both. E.g. in this case we can resolve conflict as
<div id="footer">
  please contact us at email.support@github.com
</div>
After resolving conflict use git add to add file to staging area and then commit code to complete merge prcess.
Managing Branches
Managing Branches (1)
To create new branch
$ git branch testing
$ git checkout testing
Or use shortcut to create and switch to new branch with one command
$ git checkout -b testingTo list branches (* indicates current branch)
$ git branch
  iss53
* master
  testing
To delete a branch
$ git branch -d hotfix
Deleted branch hotfix (3a0874c).
Managing Branches (2)
To view list of branches that have been merged into current branch. Branches without * have already been merged into current branch and can be safely deleted.
$ git branch --merged
  iss53
* master
To see all the branches that contain work you haven’t yet merged in
$ git branch --no-merged
  testing
Trying to delete this branch will give error. In case you want to force deletion then use -D instead of -d
$ git branch -d testing

error: The branch ’testing’ is not an ancestor of your current HEAD.
Managing Branches (3)
To push branch to remote server. (This will push local serverfix and create a new serverfix branch on remote server.)
$ git push origin serverfix:serverfix
Counting objects: 20, done.
Compressing objects: 100% (14/14), done.
Writing objects: 100% (15/15), 1.74 KiB, done.
Total 15 (delta 5), reused 0 (delta 0)
To git@github.com:schacon/simplegit.git
 * [new branch]      serverfix -> serverfix
To push branch with a different name (This will push local serverfix branch as remote newname branch)
$ git push origin serverfix:newnameManaging Branches (4)
Pulling a new branch from server is two step process.
- First you need to get latest infomration from origin with git fetch, this will create a new read only pointer to origin/serverfix which we can not modify.
- To create a local serverfix branch we need to create a new branch based on origin/serverfix
$ git fetch origin
remote: Counting objects: 20, done.
remote: Compressing objects: 100% (14/14), done.
remote: Total 15 (delta 5), reused 0 (delta 0)
Unpacking objects: 100% (15/15), done.
From git@github.com:schacon/simplegit
 * [new branch]      serverfix    -> origin/serverfix

$ git checkout -b serverfix origin/serverfix
Branch serverfix set up to track remote branch refs/remotes/origin/serverfix.
Switched to a new branch "serverfix"
Managing Branches (5) - Exercise 6
To delete a remote branch.
- First you need to get latest infomration from origin with git fetch, this will create a new read only pointer to origin/serverfix which we can not modify.
- To create a local serverfix branch we need to create a new branch based on origin/serverfix
$ git push origin :serverfix
To git@github.com:schacon/simplegit.git
 - [deleted]         serverfix
Recall that to create new branch we used git push [remotename] [localbranch]:[remotebranch]. For deleting remote branch we are leaving out local branch name. This is similar to saying take nothing from local repo and push to remote.
Tagging
Tagging (1)
Tags are simple pointers to commits, and they are incredibly useful for bookmarking important revisions like releases. The git tag command can be used to create a new tag
$ git tag -a v1.0 -m "Stable release"and to list existing tags use
$ git tagTagging (2)
Git also lets you use git checkout with tags and commit IDs, but doing so puts you in a detached HEAD state. This means that you’re not on a branch anymore—you’re directly viewing a commit. This means that you’ll lose all your work as soon as you switch back to a real branch. To create a new branch in a detached HEAD state:
$ git checkout -b <new-branch-name>After this we will have a new branch reference pointing to formerly detached HEAD
Some of the topics not covered
- Rebasing
- git archive
- Ancestry References
- Commit Ranges
- Interactive Staging
- Staging patches
- Stashing
- Interactiv rebasing
- Reordering commits
- Squashing Commits
- filter-branch
- blame
- bisect
- submodules
- hooks
Branching Strategy